Pages

Thursday, February 20, 2014

Convert a Non ASM database to ASM database in Oracle 11gR2


1. Install the ASM Binaries.

2. Configure the ASM and create 2 Diskgroups namely DATAGRP1 and FRAGRP1. Assign the respective disks to the groups.

3. Start the ASM instance and keep it up.

4. Now you will be logged in as grid user. Change the user to Oracle.

5. Create a pfile from the spfile just for a safety purpose.

create pfile=<location/init.ora> from spfile;

6. Since we are converting the instance from Non-ASM to ASM, we need to change the location of the controlfile, db_create_file_dest, db_create_online_log_dest_1 etc to the ASM location.

Set the below parameters.,

alter system set control_files=’+DATAGRP1’ scope=spfile;
alter system set db_create_file_dest=’+DATAGRP1’ scope=spfile;
alter system set db_recovery_file_dest=’+FRAGRP1’ scope=spfile;
alter system set db_create_online_log_dest_1=’+DATAGRP1’ scope=spfile;
alter system set db_create_online_log_dest_2=’+FRAGRP1’ scope=spfile;

7. Since the changes has been done to the spfile, you can take one more backup of the pfile.

8. Shutdown the database.

shutdown immediate;

9. Startup the database in nomount.

startup nomount;

10. Now connect to the RMAN,

a. If you use a seperate database for the rman catalog then use the below command.,

rman target / catalog rman/*****@catalogdb

b. If the RMAN is maintained in the same database,

rman target / 

11. Restore the controlfile to the new location.

restore controlfile from '<name of the controlfile with location>';

Egs: RMAN > restore controlfile from '/vol1/TESTDB/control01.ctl';

12. Mount the database now. (you can mount it from the RMAN prompt itself).

alter database mount;

13. Backup the database to the new location. i.e., ASM diskgroup location.

run {
allocate channel c1 device type disk;
allocate channel c2 device type disk;
allocate channel c3 device type disk;
Backup as copy database format ‘+DATAGRP1’;   
release channel c1;
release channel c2;
release channel c3;
}

14. Now the switch the database using the switch command as below.,

switch database to copy;

A backup copy is taken in the step 13. Now this switch command in RMAN will switch the entire database to the backup copy taken in to the Diskgroup '+DATAGRP1'.

15. After the switch, the database will be in a inconsistent state. So we need to recover the database. In the SQL prompt connect as sysdba and issue the below command.

recover database using backup controlfile until cancel;

16. Now recover if it prompts for any archivelogs or redo logs. Else cancel the recover using cancel command.

17. Open the database with the resetlogs option.

alter database open resetlogs;

18. Drop the old temp tablespace and recreate it in the new location (ASM Location).

a. You can drop the tablespace as a whole.

drop tablespace TEMP including contents and datafiles;

b. You can also add a new tempfile to the new ASM location and remove the old one.

alter tablespace TEMP add tempfile '+DATAGRP1' size 2048M autoextend on next 5M maxsize unlimited;

alter database tempfile '<tempfile name with location on the filesystem>' drop including datafiles;

c. Recreate the temp tablespace.

create temporary tablespace TEMP tempfile '+DATAGRP1' size 2048M autoextend on next 5M maxsize unlimited;

alter tablespace TEMP add tempfile '+DATAGRP1' size 2048M autoextend on next 5M maxsize unlimited;

19. Recreate the redo log group on ASM Diskgroup. Use the below command to list out the current Redo log group used in the database.

select a.group#, a.member, b.bytes from v$logfile a, v$log b where a.group#=b.group#;

select group#,status from v$log;

For example if you have 3 Redo log groups namely,

select group#,status from v$log;
 GROUP#         STATUS
    1                   ACTIVE
    2                   ACTIVE
    3                  CURRENT


Drop it one by one. First drop the first group, create it and then move to the second one. Before recreating the redo log group issue the below command to avoid (ORA-01624: log 1 needed for crash recovery of instance) 

alter system checkpoint global;

a. Drop and recreate the group 1.

alter database drop logfile group 2;
alter database add logfile group 1 size 100M;

b. Drop and recreate the group2.

alter database drop logfile group 2;
alter database add logfile group 2 size 100M;

c. Drop and recreate the group 3.

alter database drop logfile group 3;
alter database add logfile group 3 size 100M;


Wednesday, January 29, 2014

Purging statistics from the SYSAUX tablespace

In Oracle Database, Whenever statistics in the dictionary are modified, old versions of statistics are saved automatically for future restoring purpose. But this old statistics which are saved automatically,  are purged automatically at regular intervals based on the statistics history retention setting and the time of recent statistics gathering performed in the system.

Retention is configurable using the ALTER_STATS_HISTORY_RETENTION procedure. The default value of Retention is 31 days.

If the retention period is not managed then the SYSAUX tablespaces can grow very large.

This is only a small workout in a small database with less data. So the reclaim size of the SYSAUX tablespace will be less. There will be a huge difference in space reclaim of the SYSAUX tablespace on a big database with huge data.

This blog entry will provide the scripts and steps to diagnose and correct the excessive or rapid growth of the tablespace due to retained statistics.

1. Existing Details of the SYSAUX Tablespace

set lines 200 pages 1000
column tablespace_name format a30
column allocated format 999999.99
column free format 999999.99
column used format 999999.99
col Contiguous format 999999.99
break on report
compute sum of allocated on report
compute sum of used on report
compute sum of free on report
compute sum of contiguous on report

select rpad(a.tablespace_name,30,'.')tablespace_name,
   sum(a.bytes)/(1024*1024) Allocated,
   sum(a.bytes)/(1024*1024) - max(nvl(b.space,0)) Used,
   max(nvl(b.space,0)) Free,round(((max(nvl(b.space,0)))/(sum(a.bytes)/(1024*1024))),4)*100 perctfree,
   max(nvl(b.cont,0))/(1024*1024)  Contiguous
from dba_data_files a,
   (select tablespace_name,sum(bytes)/(1024*1024) space,max(bytes) cont
    from dba_free_space
    group by tablespace_name) b
where a.tablespace_name = b.tablespace_name(+)
and a.tablespace_name='SYSAUX'
group by a.tablespace_name
order by a.tablespace_name
/


From the output we can see that only 150 MB of free space is available in SYSAUX tablespace.


COLUMN "Item" FORMAT A25
COLUMN "Space Used (GB)" FORMAT 999.99
COLUMN "Schema" FORMAT A25
COLUMN "Move Procedure" FORMAT A40

SELECT  occupant_name "Item",
    space_usage_kbytes/1048576 "Space Used (GB)",
    schema_name "Schema",
    move_procedure "Move Procedure"
FROM v$sysaux_occupants
ORDER BY 1
/


2. Check the retention of the Stats.

select dbms_stats.get_stats_history_retention from dual;


3. Alter the retention period of the Stats to 10 Days.

exec dbms_stats.alter_stats_history_retention(10);

select dbms_stats.get_stats_history_retention from dual;


4. Now execute the below command to PURGE the Old Statistics. That is purge the statistics which are older than 10 Days. 

If there is huge data, then it is recommended to purge in stages like (sysdate-30,sydate-25 etc).

exec DBMS_STATS.PURGE_STATS(SYSDATE-10);


5. Now check the History of the Statistics availability.

select dbms_stats.get_stats_history_availability from dual;


6. Show how big the tables are and rebuild after stats have been purged.

col Mb form 9,999,999
col SEGMENT_NAME form a40
col SEGMENT_TYPE form a6
set lines 120
select sum(bytes/1024/1024) Mb, segment_name,segment_type from dba_segments
where  tablespace_name = 'SYSAUX'
and segment_name like 'WRI$_OPTSTAT%'
and segment_type='TABLE'
group by segment_name,segment_type order by 1 asc
/


7. Show how big the indexes are ready for a rebuild after stats have been purged.

col Mb form 9,999,999
col SEGMENT_NAME form a40
col SEGMENT_TYPE form a6
set lines 120
select sum(bytes/1024/1024) Mb, segment_name,segment_type from dba_segments
where  tablespace_name = 'SYSAUX'
and segment_name like '%OPT%'
and segment_type='INDEX'
group by segment_name,segment_type order by 1 asc
/


8. Now we have to rebuild the table. Here in this case, enable row movement and shrink the tables are not possible since the Indexes are function based.

So use the below script to generate the move table script.

select 'alter table '||segment_name||'  move tablespace SYSAUX;' from dba_segments where tablespace_name = 'SYSAUX'
and segment_name like '%OPT%' and segment_type='TABLE'

/


9. Run the commands generated by the script.

10. Rebuild the indexes since the status of the Indexes will be in Unusable state. 


Use the below script to generate the rebuild statements.

select 'alter index '||segment_name||'  rebuild online parallel (degree 14);' from dba_segments where tablespace_name = 'SYSAUX'
and segment_name like '%OPT%' and segment_type='INDEX'

/


11. Run the rebuild statements generated by the script.

12. Before rebuilding the indexes, the status of the indexes will be in Unusable state. After rebuilding the indexes check the status of the indexes.

select  di.index_name,di.index_type,di.status  from  dba_indexes di , dba_tables dt
where  di.tablespace_name = 'SYSAUX'
and dt.table_name = di.table_name
and di.table_name like '%OPT%'
order by 1 asc
/


13. Now check the size of the SYSAUX tablespace.

set lines 200 pages 1000
column tablespace_name format a30
column allocated format 999999.99
column free format 999999.99
column used format 999999.99
col Contiguous format 999999.99
break on report
compute sum of allocated on report
compute sum of used on report
compute sum of free on report
compute sum of contiguous on report

select rpad(a.tablespace_name,30,'.')tablespace_name,
   sum(a.bytes)/(1024*1024) Allocated,
   sum(a.bytes)/(1024*1024) - max(nvl(b.space,0)) Used,
   max(nvl(b.space,0)) Free,round(((max(nvl(b.space,0)))/(sum(a.bytes)/(1024*1024))),4)*100 perctfree,
   max(nvl(b.cont,0))/(1024*1024)  Contiguous
from dba_data_files a,
   (select tablespace_name,sum(bytes)/(1024*1024) space,max(bytes) cont
    from dba_free_space
    group by tablespace_name) b
where a.tablespace_name = b.tablespace_name(+)
and a.tablespace_name='SYSAUX'
group by a.tablespace_name
order by a.tablespace_name
/


From the output we can clearly see that there is space gain of nearly 250 MB from the Sysaux tablespace.

14. Now the Retention period is set to 10 Days. 

select dbms_stats.get_stats_history_retention from dual;


If required you can bring back the retention period to the default value 31 days.

exec dbms_stats.alter_stats_history_retention(31);

select dbms_stats.get_stats_history_retention from dual;


Sunday, January 26, 2014

Query to check Allocated Space, Used Space and Free Space of the Tablesapces in Oracle Database


The below query gives the details of the Tablespaces in a Oracle Database. It shows the details of Size allocated, Used size and Free size of the tablespaces. 


NOTE: Temporary tablespace is not included in this.


set lines 200 pages 1000
column tablespace_name format a30
column allocated format 999999.99
column free format 999999.99
column used format 999999.99
col Contiguous format 999999.99
break on report
compute sum of allocated on report
compute sum of used on report
compute sum of free on report
compute sum of contiguous on report

select rpad(a.tablespace_name,30,'.')tablespace_name,
   sum(a.bytes)/(1024*1024) Allocated,
   sum(a.bytes)/(1024*1024) - max(nvl(b.space,0)) Used,
   max(nvl(b.space,0)) Free,round(((max(nvl(b.space,0)))/(sum(a.bytes)/(1024*1024))),4)*100 perctfree,
   max(nvl(b.cont,0))/(1024*1024)  Contiguous
from dba_data_files a,
   (select tablespace_name,sum(bytes)/(1024*1024) space,max(bytes) cont
    from dba_free_space
    group by tablespace_name) b
where a.tablespace_name = b.tablespace_name(+)
group by a.tablespace_name
order by a.tablespace_name
/

Example:


Friday, January 24, 2014

MIGRATE DATA FROM OLD ASM DISK TO NEW ASM DISK


1.     INTRODUCTION / OVERVIEW

Data can be migrated from one SAN disk to another in Oracle database. The below document describes the steps to migrate the data from one ASM disk to another ASM disk.

OS admin, can perform the migration if it is on the Regular File system. There is a role for a DBA to be played, when ASM comes in to picture.

The OS admin, will add the raw disks and grant the necessary permissions to the disks which are to be added. 


cd /dev
ls –lart ASM*


In this scenario the old disk are ASM_DISK1 and ASM_DISK2.

We have to add the new disks ASM_DISK3 and ASM_DISK4 to the ASM and remove the old ones.


1.     STEPS TO ADD DISK TO ASM

1.      Check for the Existing ASM Disks. Check whether the permissions of the disk are given correctly as oracle:dba.
Pluto8:/usr2/oracle />ls -lart /dev/ASM*


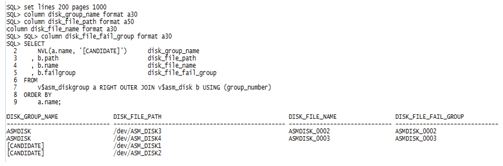
2.      From database level, when we query the ASM views, the disk added will be displayed in the view result. The name of the Disk Group will be specified as [CANDIDATE]. First we need to login to the ASM instance.

For Oracle 10g Version,

export ORACLE_SID=+ASM
sqlplus" / as sysdba "

 For Oracle 11g Version,

. ./.profile_grid
sqlplus /nolog
conn / as sysasm

SQL> set lines 200 pages 1000
SQL> column disk_group_name format a30
columndisk_file_path format a50
SQL> SQL> column disk_file_name format a30
SQL> column disk_file_fail_group format a30
SQL> SELECT
  2      NVL(a.name, '[CANDIDATE]')      disk_group_name
  3    , b.pathdisk_file_path
  4    , b.name                          disk_file_name
  5    , b.failgroupdisk_file_fail_group
6  FROM
  7      v$asm_diskgroup a RIGHT OUTER JOIN v$asm_disk b USING (group_number)
8  ORDER BY
9      a.name;


You can even check the disk info as below.,


3.      Add the disk to the ASM.
alterdiskgroup ASMDISK add disk '/dev/ASM_DISK3','/dev/ASM_DISK4' rebalance power 9;


4.      After adding the disk to the ASM, check the free space in ASM.


5.      After executing the command for adding disk to the ASM, the disk will be added soon but there will be a data Re-Org processing inside the ASM. So it will take some time for it to get completed. To check the status of the process issue the below query.,

select * from v$asm_operation;


From the above result we can clearly see that there is a Rebalancing operation going on in ASM. The Estimated Time for completion is 7mins.

6.      Keep on checking the status of the view v$asm_operation. At one specific time the result will selects no rows. It means the disk has been successfully added to the ASM and the Rebalance of the DATA is also completed successfully.


7.      In the same way all the disks are added to the ASM. Check the ASM view to see the status of the Added disks.,


2.     REMOVE DISK FROM ASM

Deletion / Removal of disks are similar to the Addition of disks to the ASM. The command to remove the disk will vary.

In Migration of ASM Disk, to add a disk to the ASM we use the OS Level name of the disk, whereas while dropping / removing a disk from ASM we should specify the Database level name of the Disk. This we can get it by querying the view v$asm_diskgroup.

The below are the steps to carry out the Removal Of Disk from ASM.

1.    Check the current status of the ASM.


The above is the current status of the ASM.

2.      To drop or remove a disk from ASM issue the below command.,
alterdiskgroup ASMDISK drop disk ASMDISK_0000,ASMDISK_0001 rebalance power 9;


3.      As we saw in the addition of disk, here also a Disk Re-Org or Rebalance operation will be processed.


4.      Wait till the Rebalance operation to complete. The view should return no rows.


5.      Now check the status of ASM disks,


1.      Once after removing the disk from the ASM, a restart of the database is required. There will be some locks existing on disks in the OS level. So OS team will be not able to remove the old disks.

2.      After restarting the Database inform to OS team so that they will easily remove the old Disks.

1.     CONCLUSION

a.      The Migration of Data can be done Online.
b.      Only removal of disk needs a reboot whereas for adding disks restart of the database is not required.


Friday, January 17, 2014

PREVENT USERS (SCHEMAS) FROM GETTING DROPPED


The below is the Trigger which is used to prevent the users or schemas from getting dropped.

Create OR Replace Trigger TrgDropUserRestrict
Before Drop On Database
Declare
Begin
     If Ora_Dict_Obj_Name In ('SH','OUTLN','SCOTT','user1')    Then
                     Raise_Application_Error(-20001,'Cannot Drop User
                    '||ora_dict_obj_name||' Contact Your Database Administrator For Dropping This User !');
     End If;
End;
/


1. create a new user and grant privileges to the new user.

ORADB>create user user1 identified by laser default tablespace users;

User created.

ORADB>grant connect,resource,debug connect session,debug any procedure to user1;

Grant succeeded.

ORADB>    

ORADB>select username from all_users where username = 'USER1';

USERNAME
------------------------------
USER1

ORADB>

2. Run the procedure to prevent the user to be dropped.

ORADB>Create OR Replace Trigger TrgDropUserRestrict
Before Drop On Database
Declare
Begin
     If Ora_Dict_Obj_Name In ('SH','OUTLN','SCOTT','USER1')    Then
                     Raise_Application_Error(-20001,'Cannot Drop User
                    '||ora_dict_obj_name||' Contact Your Database Administrator For Dropping This User !'); 
     End If;
End;
/  2    3    4    5    6    7    8    9   10  

Trigger created.


Note: You can specify N number of users in the Ora_Dict_Obj_Name which should not get dropped.


3. Try to drop the user and check if the user is dropped.

ORADB>drop user user1 cascade;
drop user user1 cascade
*
ERROR at line 1:
ORA-00604: error occurred at recursive SQL level 1
ORA-20001: Cannot Drop User
user1 Contact Your Database Administrator For Dropping This User !
ORA-06512: at line 4

ORADB>

ORADB>drop user scott cascade;
drop user scott cascade
*
ERROR at line 1:
ORA-00604: error occurred at recursive SQL level 1
ORA-20001: Cannot Drop User
SCOTT Contact Your Database Administrator For Dropping This User !
ORA-06512: at line 4


Thursday, January 9, 2014

Unable to remove ASM Diskgroup from the ASM Instance

SCENARIO


  • I Was not able to remove the newly added ASM diskgroup ASM_DISK1 from ASM instance.


INSTANCE - ASM

ASM GRID - ORACLE 11G

REMOVED DISKGROUP NAME - ASM_DISK1

OS LEVEL DISK NAME ASSIGNED - DATA1

OPERATING SYSTEM - OEL 6.0


WORKINGS


SQL> select name from v$asm_diskgroup;

NAME
---------------------------------
DATA_GRP1
ASM_DISK1

SQL> select name from v$asm_disk;

NAME
---------------------------------
DATA_GRP1_0000
ASM_DISK1_0000

  • While dropping the diskgroup, i got the following error and I was not able to drop it.,

SQL> alter diskgroup ASM_DISK1 drop disk ASM_DISK1_0000;
alter diskgroup ASM_DISK1 drop disk ASM_DISK1_0000
*
ERROR at line 1:
ORA-15032: not all alterations performed
ORA-15250: insufficient diskgroup space for rebalance completion


SQL> alter diskgroup ASM_DISK1 drop disk ASM_DISK1_0000 rebalance power 8;
alter diskgroup ASM_DISK1 drop disk ASM_DISK1_0000 rebalance power 8
*
ERROR at line 1:
ORA-15032: not all alterations performed
ORA-15250: insufficient diskgroup space for rebalance completion

  • Checked the Total space and Free space of the ASM Diskgroup. Since the disk was a newly added one, there was enough free space.

SQL> set lines 200 pages 1000
SQL> col name format a30
SQL> select name,total_mb,free_mb from v$asm_disk;

NAME TOTAL_MB    FREE_MB
------------------------------ ----------         ----------
DATA_GRP1_0000   21050           20998
ASM_DISK1_0000   5567        5508


  • I tried to drop it again,


SQL> drop diskgroup ASM_DISK1 including contents;
drop diskgroup ASM_DISK1 including contents
*
ERROR at line 1:
ORA-15039: diskgroup not dropped
ORA-15027: active use of diskgroup "ASM_DISK1" precludes its dismount

  • I dismounted the diskgroup and tried to drop it.

SQL> alter diskgroup ASM_DISK1 dismount force;

Diskgroup altered.

SQL> drop diskgroup ASM_DISK1 including contents;
drop diskgroup ASM_DISK1 including contents
*
ERROR at line 1:
ORA-15039: diskgroup not dropped
ORA-15001: diskgroup "ASM_DISK1" does not exist or is not mounted

  • The below was the solution which I followed to remove the ASM diskgroup from the ASM Instance.

  • Created a pfile from the spfile in a different location and restarted the database using that pfile.

SQL> show parameter spfile 


NAME  TYPE      VALUE
------------------------ -------------------  ------------------------------------------------------------------------------
spfile  string      +ASM_DISK1/asm/asmparameterfile/registry.253.836335963


SQL> create pfile='/vol2/grid/init.ora' from spfile;

File created.

SQL> shut immediate
ASM diskgroups dismounted
ASM instance shutdown
SQL> startup nomount pfile='/vol2/grid/init.ora';
ASM instance started

Total System Global Area  283930624 bytes
Fixed Size    2227664 bytes
Variable Size  256537136 bytes
ASM Cache   25165824 bytes
SQL> 

SQL> alter diskgroup ASM_DISK1 mount;

Diskgroup altered.

SQL> drop diskgroup ASM_DISK1 including contents;

Diskgroup dropped.


  • Now mount the other ASM diskgroup.

SQL> alter diskgroup DATA_GRP1 mount;

Diskgroup altered.

SQL> create spfile from pfile='/vol2/grid/init.ora';

File created.

SQL> shut immediate
ASM diskgroups dismounted
ASM instance shutdown


  • Now create a spfile from the pfile and start up the instance.

SQL> create spfile from pfile='/vol2/grid/init.ora';

File created.
SQL> shut immediate
ASM diskgroups dismounted
ASM instance shutdown
SQL> 
SQL> startup
ASM instance started

Total System Global Area  283930624 bytes
Fixed Size    2227664 bytes
Variable Size  256537136 bytes
ASM Cache   25165824 bytes
ORA-15032: not all alterations performed
ORA-15017: diskgroup "ASM_DISK1" cannot be mounted
ORA-15063: ASM discovered an insufficient number of disks for diskgroup
"ASM_DISK1"


  • Here I faced another error. Even though after successful dropping of the ASM Disk, while starting the ASM instance, it automatically referred the removed disk also.
  • So I deleted the ASM disk using the Oracleasm command,

oracleasm deletedisk DATA1

[root@primary ~]# oracleasm deletedisk DATA1
Clearing disk header: done
Dropping disk: done
[root@primary ~]# oracleasm listdisks
DATA2
[root@primary ~]# oracleasm scandisks
Reloading disk partitions: done
Cleaning any stale ASM disks...
Scanning system for ASM disks...
[root@primary ~]# 


  • I also changed the value of ORACLEASM_SCANORDER="" to ORACLEASM_SCANORDER="dm". But this also did not work.

primary:/vol2/grid />cat /etc/sysconfig/oracleasm
#
# This is a configuration file for automatic loading of the Oracle
# Automatic Storage Management library kernel driver.  It is generated
# By running /etc/init.d/oracleasm configure.  Please use that method
# to modify this file
#

# ORACLEASM_ENABELED: 'true' means to load the driver on boot.
ORACLEASM_ENABLED=true

# ORACLEASM_UID: Default user owning the /dev/oracleasm mount point.
ORACLEASM_UID=

# ORACLEASM_GID: Default group owning the /dev/oracleasm mount point.
ORACLEASM_GID=

# ORACLEASM_SCANBOOT: 'true' means scan for ASM disks on boot.
ORACLEASM_SCANBOOT=true

# ORACLEASM_SCANORDER: Matching patterns to order disk scanning
ORACLEASM_SCANORDER=dm

# ORACLEASM_SCANEXCLUDE: Matching patterns to exclude disks from scan
ORACLEASM_SCANEXCLUDE=""

primary:/vol2/grid />


  • Even though after deleting the ASM disk in OS level, the ASM instance was starting with the error.

SQL> conn / as sysasm
Connected to an idle instance.
SQL> startup
ASM instance started

Total System Global Area  283930624 bytes
Fixed Size    2227664 bytes
Variable Size  256537136 bytes
ASM Cache   25165824 bytes
ORA-15032: not all alterations performed
ORA-15017: diskgroup "ASM_DISK1" cannot be mounted
ORA-15063: ASM discovered an insufficient number of disks for diskgroup
"ASM_DISK1"


SOLUTION

  • Remove the old diskgroup name from the parameter file (PFILE) asm_diskgroups.

SQL> show parameter asm_diskgroups

NAME   TYPE  VALUE
------------------------------  ----------------  ------------------------------
asm_diskgroups   string   DATA_GRP1, ASM_DISK1
SQL> 

SQL> alter system set asm_diskgroups='DATA_GRP1' scope=both;

System altered.

SQL> show parameter disk

NAME   TYPE  VALUE
------------------------------  ----------------  ------------------------------
asm_diskgroups   string  DATA_GRP1
asm_diskstring   string /dev/oracleasm/disks/*
SQL>

  • Create a pfile from spfile.

SQL> create pfile='/vol2/grid/init.ora' from spfile;

File created.

  • Startup the ASM instance with the pfile.

SQL> shut immediate
ASM diskgroups dismounted
ASM instance shutdown

SQL> startup pfile='/vol2/grid/init.ora';
ASM instance started

Total System Global Area  283930624 bytes
Fixed Size     2227664 bytes
Variable Size   256537136 bytes
ASM Cache    25165824 bytes
ASM diskgroups mounted
SQL>

  • ASM Started normally.

  • Create a SPFILE and restart the ASM instance.

SQL> create spfile from pfile='/vol2/grid/init.ora';

File created.

SQL> shut immediate;
ASM diskgroups dismounted
ASM instance shutdown
SQL> startup
ASM instance started

Total System Global Area  283930624 bytes
Fixed Size    2227664 bytes
Variable Size  256537136 bytes
ASM Cache   25165824 bytes
ASM diskgroups mounted
SQL> 

SQL> set lines 200 pages 1000
SQL> col name format a25
SQL> select name,total_mb,free_mb from v$asm_disk;

NAME    TOTAL_MB FREE_MB
-------------------------   ----------      ----------
DATA_GRP1_0000     21050         20998

SQL> select name,total_mb,free_mb from v$asm_diskgroup;

NAME     TOTAL_MB FREE_MB
-------------------------   ----------      ----------
DATA_GRP1          21050         20998

SQL> 

  • Now we can see that there was no error message during the instance startup.